Monday, October 7, 2013

Split Pea Soup with Ham

Now that fall's upon us, time to think about soup, soup and more soup!  Main dish hearty soups are so easy to make and are a satisfying dinner for your family. Heck, even if you're a single person or a couple, make this recipe and freeze the leftovers or bring for a work lunch the next day.

Huge chunks of carrots and ham swimming in velvety earthy split peas embraced by flavoured broth and spices makes for some good eating.  I almost want it to rain when I make a soup like this.  Crazy, I know.  But there's something so soothing about cooking a soup from scratch while the rain pelts against the window. It's good for the soul!

Here's what you'll need:
                           12 C chicken stock (not shown)
                           2 C split peas
                           2 medium onions, chopped
                           2 large carrots, large chop
                           1 C chopped celery
                           1/4 C olive oil
                           1 - 454 gm ham steak with bone
                           2 t cumin
                           1 t granulated garlic
                           2 t thyme
                           2 T dried parsley
                           salt and black pepper to taste
                          
Saute onions and celery in oil in a large soup pot over medium heat, about 5 minutes.
Add broth and everything else except 
the carrots, parsley and ham.
(You can season with salt and pepper later.)
Bring to a boil.
Do notch out the bone from the ham steak and add to pot.
Cover and simmer on medium heat for about an hour.
These are the remaining ingredients.
I've cubed the ham into fairly large pieces.
Add ham, carrots and parsley to the pot.  Cover.  
Simmer for another 20 minutes until carrots are tender.

The consistency will be "soupy".
If you want it thicker, uncover and increase heat. 
Boil down until desired consistency is achieved.
I did this for about 10 minutes.
Season with salt and pepper to taste.
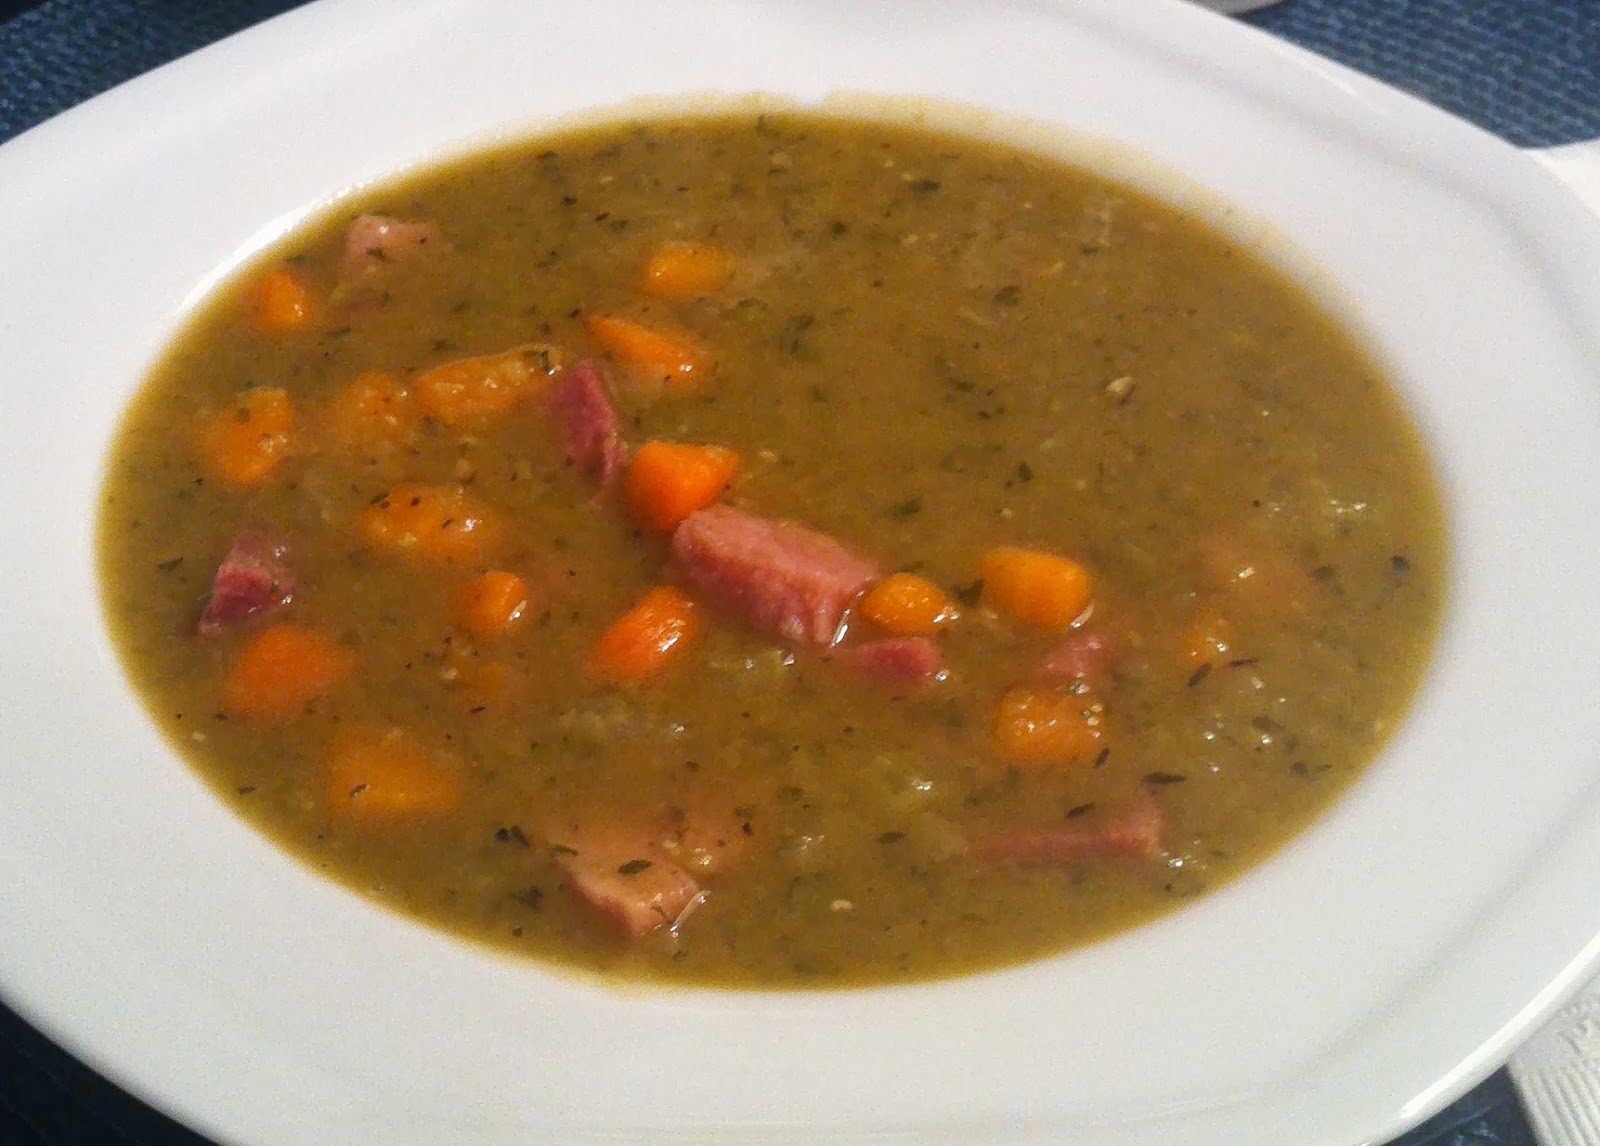
Here it is!
A piping hot, hearty main dish soup.
Chunks of salty ham and sweet carrots peaking through.
Serve with some crusty bread and 
a crisp green salad to round out your meal.
 
Two bowlfuls later in his tummy...
Our guest Justin gives a big thumbs up!
You will too!


Friday, October 4, 2013

Guest Room Bliss!

Making overnight guests welcome in your home is an art.  Those considerate little touches make their experience a memorable event.  Leave them talking to their friends about how you thought about this and left them that to enjoy!

Now in this post, I've gone beyond the little accoutrements that kick up the guest room experience.  If you're thinking about redecorating your guest boudoir, I've thrown in some suggestions to get you started on a path to hotel/high end luxe for your visitor's sanctuary.
What a luxurious headboard that sings comfort and elegance!

Such a great night table to anchor the room.
A nice deep drawer to house your guest's books, etc.


Add some sparkle to the room with crystal based lamps.
A tri-light is perfect to adjust the mood of the space.

I love soft blue bedding for a bedroom.
This set will surely soothe your guest into sweet slumber!

Add a coverlet for a splash of colour to your ensemble.
It's also great for extra warmth on a cold night!
I just love the combo of blue and coral.

Add some coral throw cusions in different patterns.
These are from www.etsy.com
Tons to choose from - make your selection your own!


Paint your walls a soothing soft colour like this pale blue.

Feather Gray by Candice Olson

Anchor the room with a cozy area rug.

Some fresh flowers at bedside are always welcoming.
Add lots of ice to this pretty carafe so guests have water 
for pills, etc. or even just that welcome drink late night.


Put all accoutrements on a sparkly silver tray like this one.


Add some chocolaty bites for a guarantee of sweet dreams!
Truffles...


A stack of magazines for some anytime reading.

Sometimes a little late night TV is in order.


How great is this?  
A luggage rack for ease of packing and unpacking.


A little ambience with a scented candle is lovely.


Add a nice mirror so guests can spruce themselves up.
Put a cheaper full length on the inside of a closet door.
More sparkle!

Some fluffy towels on the bed for showering, etc.
Create your own basket of toiletires 
with travel sizes from the drugstore.
Your guest will love you for this!
Drift into dreamland with a mask and ear plugs 
to keep the slumber sustained.

Supply a stylish alarm clock so your guest will know 
what time to wake up for your scrumptious breakfast!

I would recommend adding a comfy chair with an ottoman where your guest can cozy up with a great book & cup of tea.

And now that your masterpiece 
is complete & ready to be experienced, 
invite me so I can test out the amenities!
My bag is packed!


Wednesday, September 18, 2013

Greek Style Pasta for the Brain Dead

Happy Thursday you Zombie Brained Cuisinists!  It's getting close to the weekend and it's time to pull together a simple but most excellent dinner for you and yours.

What doesn't taste good with pasta?  Before you throw back some silly comments, know that was pretty much a rhetorical question.

Pasta is not just for Italians anymore. The Greek trifecta of tomatoes, kalamata olives and feta are made for pasta.  Add some olive oil and the traditional Greek seasoning of oregano, and you have one heck of a mouthwatering meal that's fast and requires very little skill level.

I think the longest part is boiling the water. Once that's done, you can effectively have this in your tummy within 15 minutes!

So let's stop wasting time.  I can hear the growling of hunger and it's time to put that savage beast to rest!

Here's what you'll need:
                                 2.5 C dry bowtie aka farfalle pasta
                                 1 540 ml can Aylmer's olive oil and 
                                 garlic diced tomatoes
                                 1/2 C pitted kalamata olives (about 20)
                                 Feta cheese (200 gm container)
                                 1 t oregano
                                 2 T olive oil
         This makes 2 generous portions for 2 hungry folks.
Add pasta to rapidly boiling salted water.
Reduce to medium - high just so it doesn't boil over.
It will need to cook for about 11 minutes until it is all dente.*
While the pasta boils, you can ready your other ingredients.
*Al dente means it still has firmness but your teeth can easily sink through it.
Place diced tomatoes into a medium saucepan.
Using a hand blender, process until about 2/3rds smooth,
leaving some chunks of tomato for some bite.
It should look like this.
Add the oregano and olive oil.
Cook over medium high heat to boil down some of the liquid.
It should look fairly thick after about 5 minutes or so.
Meanwhile, coarsely chop up olives.
My local market has the pre-pitted kind in the deli area.
What a time saver!  If you can't find them pre-pitted, 
click here for how to  do it easily in no time flat.
Crumble feta cheese, leaving 2 T aside to "crown" your plates.
Drain pasta.
Place pasta in large bowl and add feta and olives...

...and the tomato sauce.
Toss well.
Divide between 2 plates.
Top each serving evenly with reserved feta.

Tangy tomatoes...
Brine kissed feta...
Earthy kalamata olives.
Soooo easy and soooo delicious!

For Brain Dead Thursday, 
I think I'll call this dish...
Zombie the Greek!

Monday, September 16, 2013

Upside Down Pear Almond Cake

My niece, Mare has a lovely pear tree in her yard.  She was generous enough to part with a branch or two. This made for good eating on their own but also, inspired me to make a lovely coffee cake with this wonderful fall fruit.  

Pears and almonds are excellent taste companions and this combo gives the cake a heavenly taste. Enhanced by some caramel, simply divine.

Now here's a tip.  You can mix up the recipe by using the same batter and changing the fruit.  Try apples and walnuts, peaches with pecans or almonds.  How about a good old fashioned pineapple upside down cake using canned and drained crushed pineapple and some maraschino cherries?

Don't let your coffee be lonely.  It pines for a slice of this yummylicious gateau! 

Here's what you'll need:
Preheat oven to 350 degrees.

                  Caramel:

                      1/4 C brown sugar
                            2 T butter

                  Cake:

                      3 medium pears, peeled, 
                            cored and sliced
                            1/4 C sliced almonds
                            1 1/3 C C all purpose flour
                            3/4 C sugar
                            1/4 C butter
                            2/3 C milk
                            1 egg, beaten
                            2 t baking powder
                            1/2 t salt
                            1 t vanilla

 
Spray a 9 inch spring form pan with non-stick spray.
Peel, core and slice the pears.
I cut them in quarters, then slice each section into thin slices.
Melt 2 T butter in small pan over medium heat.
Add brown sugar.
If you want your cake really caramelly, double the amount.
For me, this is perfect and not too much.
Stir together until it looks like this.
Spread over bottom of spring form pan.
Now sprinkle the almonds over the caramel.
Arrange the pears slices over the almonds.
It doesn't have to be perfect.  Mine isn't!
Melt the 1/4 C butter in the microwave 20 secs at 50% power.
Make sure it's cool before you add the egg so it won't cook!
In a small bowl, mix together butter, egg, milk and vanilla. 
In a medium sized bowl, mix flour, sugar, soda and salt.
I actually used Splenda instead of sugar to reduce calories. 
It turned out great!
 
Pour liquid mix into dry mix.
Blend together completely. 
Thoroughly mixed batter should look like this. 
Pour batter over pears. 
Spread evenly to edges.
Bake at 350 degrees for 30 minutes. 
Invert on serving plate. 
What a beauty!
Glistening caramelized pears!
 
Serve with a dollop of unsweetened whipped cream...
or vanilla ice cream.
And you know what?  It's perfect completely on its own!

Addendum!
One of my blog devotees made this with peaches and pecans.
Here are some pics from Nora's creation.
A must try!